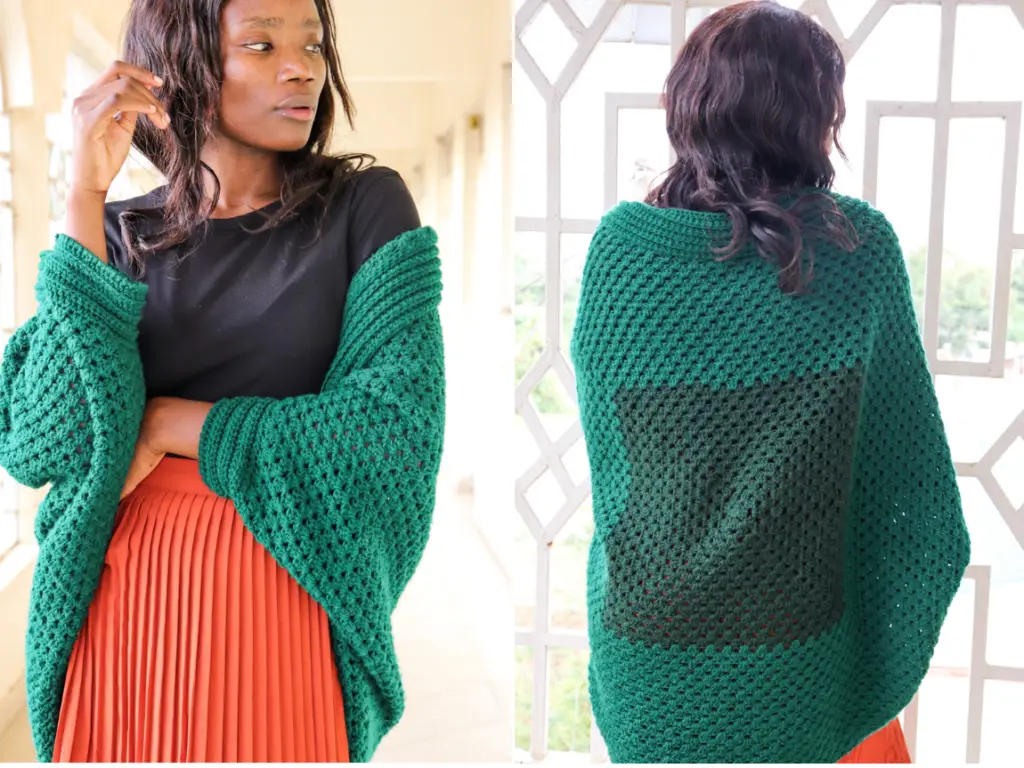
If you love an easy to wear cardigan, then the cocoon cardigan is one you should own. This granny square cocoon cardigan has been a favorite piece of clothing in my wardrobe. It is easy to wear and is literally a blanket with sleeves.
This post may contain affiliate links or referrals. I make a small commission from purchases made through the links at no extra cost to you. You can read our privacy policy for more information.
I used two strands of fingering yarn to keep it light even when it’s made large. You can however customize this depending on your preference. Despite using fingering yarn, the cocoon cardigan is still warm enough to wear on a chilly weather.
Construction.
The cocoon cardigan is constructed in one piece. It starts as a square, then after working a number of rows, you cut yarn and start working on the sides to create a rectangle.
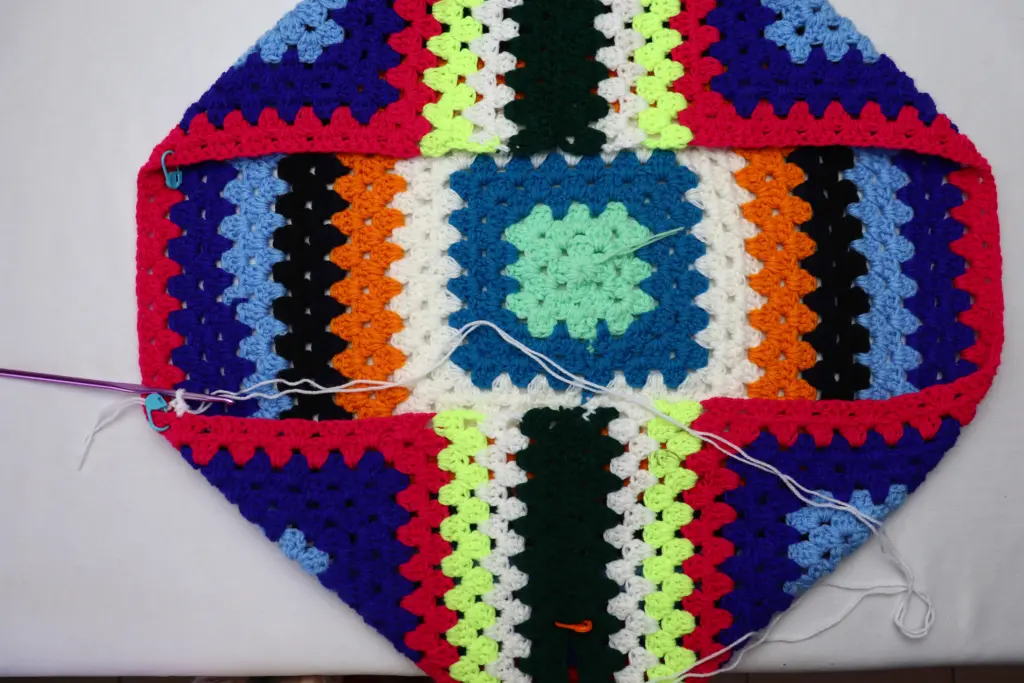
Once the body is complete, the sides added are then folded to meet at the center of the cardigan then sewn to create armholes.
The neck band and sleeves are then added later to complete the cardigan. See schematics below for a visual representation.
Skill Level: Easy
Sizes Available. XS-M, L-2XL, 3XL-5XL.
Video tutorial.
Materials
- I used 2 strands of fingering yarn in this pattern. You can substitute this with one strand of a Light/Dk yarn. Ensure your gauge is correct. Yarn needed 950g, 1130g, 1200g
- 4.5 mm crochet hook, or any to obtain gauge.
- Pair of scissors
- At least 2 stitch markers
- Tape measure
- Yarn needle
Notes
- The sizing guide follow size xs-m, l-2xl, 3xl-5xl. {See measurements table below for exact measurements for each size.}
- Repeat instructions between asterisk (**) as stated in the pattern.
- The cardigan is made in one granny square piece, then sides added to the square. After that the sides are folded towards the center and sewn up to create armhole. The neckband is then added to the front open side of the cardigan.
- Join all rounds with a slip stitch to the first stitch {the ch3 at the beginning of round}.
- Ch 3 at te beginning of new round counts as a dc stitch.
- Turn after every round and/or row.
- Number stated at end of every round is the count of granny stitches (3dc clusters).
- Each granny stitch is a set of 3dc sts in the same space, also referred to as 3dc cluster.
Abbreviations (US Terms)
Ch – chain inc – increase
Dc – double crochet sdc – standing double crochet
Ch-sp – chain space MC – Main color
Sq – square nxt – next
Sp – space. Ch-2 sp – chain 2 space.
Gauge.
- Approximately 5 rounds of granny square measures 4.5”x 4.5”
- 7 rows measure 3”
Stitch Explanation.
Granny stitch: 3 double crochet in the same space. Sometimes written as 3dc cluster.
Standing double crochet : make a slip knot, yarn over, insert hook in the space specified, yarn over and draw a loop, yarn over draw through 2 loops, yarn over draw through the last 2 loops.
Increase: 3double crochet, chain 2, 3double crochet all in the same space. This is done in the corner chain 2 spaces of the granny square.
Mattress stitch join: insert needle through 2 stitches on one panel, then thread the needle through 2 stitches on the opposite panel. Continue to few rows then draw the yarn to close the stitches. Do this until the sides are joined as stated in pattern.
Finished Size Measurements.
| Size | Back Width | Full Width | Full length |
| XS-M | 30” | 37” | 30” |
| L-2XL | 41” | 47” | 41” |
| 3XL-5XL | 45” | 50” | 45” |
Schematics

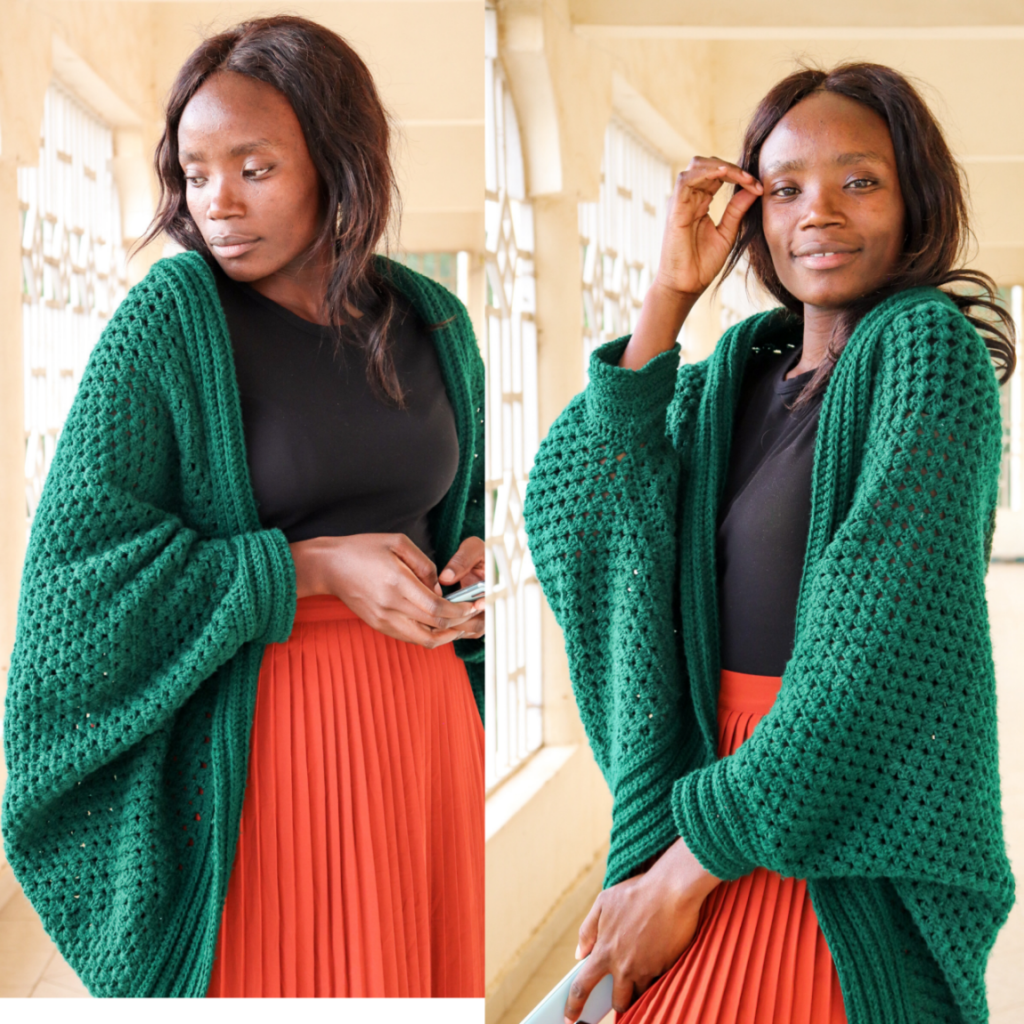
Crochet Cocoon Cardigan Pattern.
Centre Square.
{Start with a magic ring / Chain 4, join to first chain with a slst}
Round 1.
Ch3(first dc), 2dc in the ring, (ch 2, 3dc) x2, ch2 and join in first ch3 with a slst. Turn
Round 2.
Ch3,{ 2dc ch 2,3dc} in the nxt ch-2 sp, (3dc, ch2, 3dc in the nxt ch-2 sp) rep pattern in brackets () to end of round. Join in first ch3 with a slst. Turn
Round 3.
Ch3, 2dc nxt space, *{3dc,ch 2,3dc} nxt ch-2 sp, sk the 3dc cluster, 3dc nxt sp, rep pat from * to last ch-2 sp, Join in first ch 3 with a slst. Turn
Round 4,
Ch3, 2dc nxt space, (3dc,ch 2,3dc) in nxt ch-2 sp,
*[3dc in the sp(s) after the 3dc cluster] rep to next ch-2 sp, (3dc,ch 2,3dc) in next ch-2 sp,* repeat pattern from * to * to end of the round, ending in a sp after a 3dc cluster(not ch-2 sp),
Join in first ch 3 with a slst. Turn
Repeat round 4 pattern, working 3dc in spaces between the 3dc clusters and increases(3dc ch 2, 3dc) in the corner ch-2 sp(s), until you have 37 (39, 41)rounds or square measures 30”(32” 34”). Ch 1 & cut yarn
This will be the full height of the cardigan. Add more rows if you want it longer.
Adding side rows.
Turn to WS.
Start on the side you just finished on.
[Row 1.
Join yarn with a standing dc in the bottom ch-2 sp, 2dc in the same sp, [3dc in the sp(s) after the 3dc cluster] rep to next ch-2 sp, 3dc, in the ch-2 sp. Turn.
Row 2.
Ch 3, [3dc in the sp(s) after the 3dc cluster] rep to last sp, dc, in the last st {the sdc of prev row}. Turn.
Row 3.
Ch 3, 2dc in the next sp, [3dc in the sp(s) after the 3dc cluster] rep to last sp, 2dc in the sp, dc in the ch 3. Turn.
Rep row 2&3 until you have 10(14, 16) rows.
Fasten off.]
Opposite side rows.
Turn to the opposite side on the WS
Repeat pattern in []to end of the opposite side.
Joining Side seams.
Do this for both sides.
- With WS outward, fold the side rows to meet as seen in the pic below.
- Mark 5(6,7) for the sleeves.
- Using whip stitch or your favorite joining method, Seam the sides, leaving space for the sleeves.
- Turn to RS.
Adding Neckband.
With cardigan laying flat, mark the bottom spaces where you have a fold,(see image below.)
Row 1.
- Join yarn in the st next to marker with a standing hdc, hdc in ea st to side rows,
- At the row sts, place 2hdc around each dc st,
- Continue with hdc in ea st to the opposite side row sts, place 2hdc around each dc st to end of row sts, hdc in ea st to last st before marker. Turn
Row 2.
Ch1, hdc blo in ea st to the last st, hdc last st.
Rep row 2 until you have 11(11,13) rows.
Fasten off.
Sleeves.
Repeat the pattern on both sleeves.
Round 1.
Join yarn in the st at the seam with a standing hdc, hdc in ea st around the sleeve, join it to first st with a slst, Turn.
Round 2.
Ch1, hdc first st, hdc blo in ea st to end of round, join it to first st with a slst, Turn.
Repeat round 2 until you have 9 rounds.
You can add more rounds for a longer sleeve ribbing.
Weave in loose ends then enjoy your cardigan!
If you loved the cocoon cardigan pattern, you can Check out more cardigan patterns here.


Leave a Reply