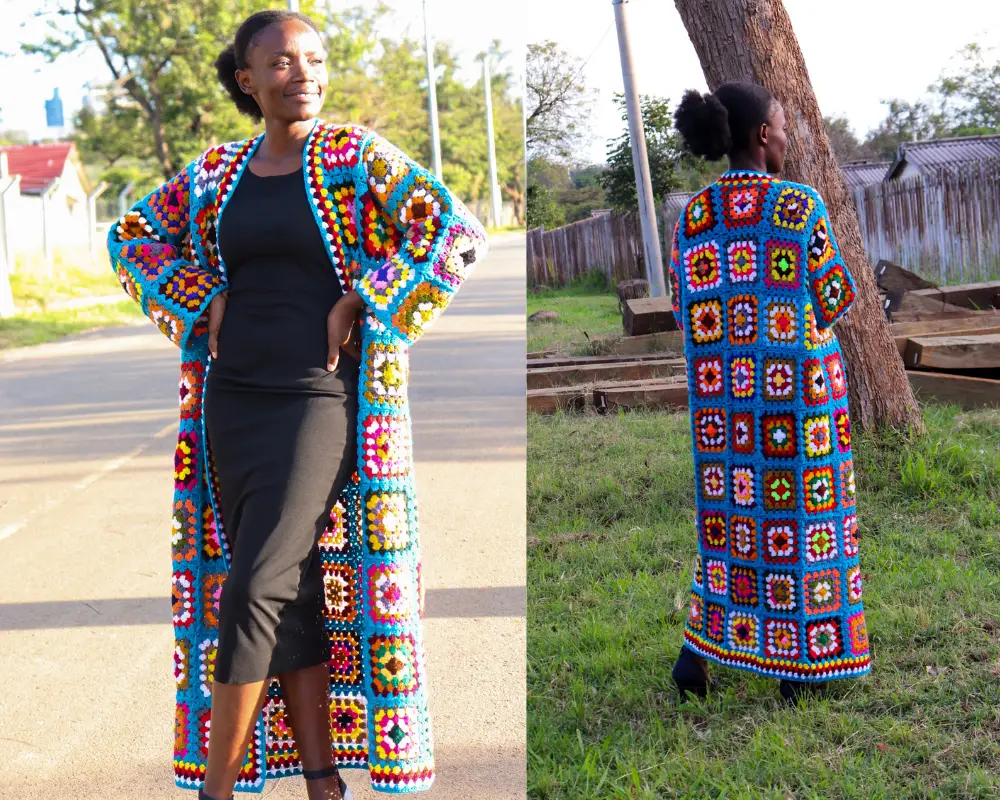
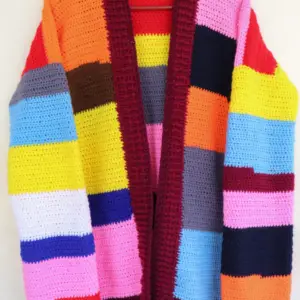
Granny square cardigans are trendy and they have taken the internet by storm lately. I decided not to be left out. Crochet has become so popular in these last years and everyone seems interested in making their own clothes. Good thing is, you can too with this cardigan pattern.
Granny square cardigans are classic whether short, midi or long. I personally loved the long version because it can double up as a cover up or just a regular cardigan.
Using different colors for each square, this granny square cardigan pattern is an excellent way of using up scrap yarns or clearing your stash. It can also be a good way to plan your whole year project by making a square a day or every other day. If you want to make it in one week binge watching your favorite TV show, who am I to say no?
LATEST VIDEOS
The beauty of working with scrap yarn projects is that you can use your own customized colors without necessarily copy pasting the pattern colors. This gives you a wide spectrum to be creative or just explore your creativity.
Yarn Used.
I used regular fine yarn and doubled the strands to achieve a light weight yarn. Since i had lots of fine yarn in my stash, i decided to use these to avoid buying more yarn. I also prefer doubling 2 strands of fine yarn for most of my projects. This is a long cardigan and it can really weigh you down if you use a heavier yarn.
The only yarn you will need in a larger quantity is the main color used as an outline for the border of each square.
pin me for Later Here!

You may also like:
- Crochet EASY granny stitch poncho. 2. Crochet Off the shoulder Sweater. 3. Easy Crochet Moss Stitch Scarf

This post may contain affiliate links or referrals. I make a small commission from purchases made through the links at no extra cost to you. You can read our privacy policy for more information.
THE PATTERN IS WRITTEN IN US TERMINOLOGY.
Skill Level: Easy
Yarn Weight: dk / 2 strands of fine yarn
Notes.
- The sizing guide follow size XS, S&M, L-2XL, 3XL-5XL.
- Repeat instructions between asterisk (**) as stated in the following statement.
- The cardigan is made using granny squares which are then joined as you go in five pieces; 2 front panels, 1back and 2 sleeves panels that are then joined together using the mattress join method.
- New color is joined in every round using a standing double crochet.
- Join all rounds with a slip stitch to the standing double crochet, then slst to the next st.
- Number stated at end of every round is the count of granny stitches(3dc clusters).
- Each granny stitch is a set of 3dc sts also referred to as 3dc cluster.
Stitch Explanation.
Granny stitch: 3 double crochet in the same space. Sometimes written as 3dc cluster.
Standing double crochet : make a slip knot, yarn over, insert hook in the space specified, yarn over and draw a loop, yarn over draw through 2 loops, yarn over draw through the last 2 loops.
Increase: 3double crochet, chain 2, 3double crochet all in the same space. This is done in the corner chain 2 spaces of the granny square.
Mattress stitch join: insert needle through 2 stitches on one panel, then thread the needle through 2 stitches on the opposite panel. Continue to few rows then draw the yarn to close the stitches. Do this until the sides are joined as stated in pattern.
MATERIALS
- I used 2 strands of fingering yarn in the pattern. You can substitute this with one strand of a Light/Dk yarn. Approximately yarn needed.
| Sizes | xs-m | l-xl | 3xl – 5xl |
| Total | 1120g | 1299g | 1541g |
| Main (MC) | 431g | 501g | 594g |
- 4.5 mm crochet hook, or any to obtain gauge.
- Pair of scissors
- At least 2 stitch markers
- Tape measure
- Yarn needle
GAUGE
Approximately 5 rounds of granny square measures 4.5”
ABBREVIATIONS/STITCHES USED
Ch – chain inc – increase
Dc – double crochet sdc – standing double crochet
Ch-sp – chain space MC – Main color
Sq – square Prev – previous
Cont – continue Rep – repeat
Ea – each
Finished Size Measurements:
Finished bust: 38(45,50,63)
Full length: 37(41,45,50)
Schematics & overview
- Make 99 squares for xs to 2xl. Make 90 squares for 3xl to 5xl.
- If you want a shorter version, reduce the number of squares in multiples of 9(5 back & 4 front).

Granny Square.
For all sizes,
Start with a magic ring
Round 1.
Ch3(this counts as a dc st), 2dc,*ch2, 3dc* in the magic ring, rep pattern in asterisk (**) two more times, join to first ch3 with a slst on the 3rd chain, slst nxt st, ch1 & cut yarn.

Round 2.
Join new color with a standing dc in any ch2 sp, 2dc,ch2,3dc in the same space, *3dc, ch2, 3dc nxt ch2sp* rep in the nxt ch2 spaces, join to the sdc with a slst, slst nxt st, ch1 & cut yarn.

Round 3
Join new color with a standing dc in any ch2 sp, 2dc,ch2,3dc in the same space, *3dc nxt space, 3dc, ch2, 3dc nxt ch2sp* rep to last ch2sp, 3dc next space, join to the sdc with a slst, slst nxt st, ch1 & cut yarn.

Stop at round 3 for XS
Round 4
Join new color with a standing dc in any ch2 sp, 2dc,ch2,3dc in the same space, *3dc in each of the nxt 2 spaces, inc (3dc, ch2, 3dc) in the ch2 sp* rep to last space, join with slst to the sdc, slst nxt st, ch1 & cut yarn.
Stop at round 4 for S & M sizes
Round 5.
Join with sdc in any ch2 sp, 2dc, ch2, 3dc same space, Cont with the granny stitch pattern, placing 3dc in the spaces between 3dc clusters and increases(3dc,ch2,3dc) in the ch2 spaces.
Stop at round 5 for L to 2XL sizes
For sizes 3XL to 5XL, add round 6 of the granny square, increasing only in the ch2 spaces.
Make 99 squares for xs to 2xl (36 for front panels {18 for each}, 45 for back panel and 18 for sleeves{9 for each})
& 90 squares for 3xl to 5xl. (32 for front panels {16 for each}, 40 for back panel and 18 for sleeves{9 for each})
Note: if you want to make it shorter, reduce the squares by multiples of 9.
Joining Squares
Back panel.

The R1 to R9 marks the square rows. Meaning
You should have 9 rows of squares high
(lengthwise) and 5 squares across.
R1 means row 1 and R9 means row 9
Row 1 (R1)
Square 1.{sq1}
Start by working the last round of one square with your
main color.
Square 2.{sq2}
Join MC with a sdc in any ch2 sp, 2dc,ch2,3dc same space, Continue
with the granny sts to nxt ch2 sp, 3dc in the ch2 sp, ch1, attach the square 2 to any ch2sp of square1 with a slst, ch1, finish the nxt set of 3dc in the sq2 ch2sp, *slst in the nxt sp of Sq1,3dc in the nxt sp of sq2*
rep to nxt ch2 sp of sq2, 3dc, ch1,then join with a slst to the nxt ch2 sp of sq1, ch1, finish the nxt set of 3dc in the sq2 ch2sp, then cont with pattern to end of the sq2, join with slst to the sdc, slst nxt st, ch1 & cut yarn.
Join the next 3 squares with the method used for joining square 2.
Row 2 (R2)
Join the first square on the bottom row of squares from left to right{if you’re right handed] and right to left for lefties.
Square 1.{sq1}
Join MC with a sdc in any ch2 sp, 2dc,ch2,3dc same space, Continue
with the granny sts to nxt ch2 sp, {3dc,ch2,3dc} In the ch2 sp,
Continue with the granny sts to nxt ch2 sp,3dc in the ch2 sp,
ch1, attach it to the corner ch2sp of sq5 row 1 with a slst, ch1, finish the nxt set of 3dc in the sq2 ch2sp, *slst in the nxt sp of bottom Sq,3dc in the nxt sp of sq1* rep to nxt ch2 sp of sq1, 3dc, ch1,then join with a slst to the nxt chain spaces of the 2 bottom squares, ch1, finish the nxt set of 3dc in the sq1 ch2sp, then cont with pattern to end of the sq1,join with slst to the sdc, slst nxt st, ch1 & cut yarn.
Square 2.{sq2}
With MC, work one side of the granny square,{from one ch2 sp to the next} 3dc in the ch2 sp, ch1, attach the square to the top ch2sp of prev sq with a slst, ch1, finish the nxt set of 3dc, *slst in the nxt sp of prev sq, 3dc in the nxt sp of new sq* rep to nxt ch2 sp, 3dc, ch1,then join with a slst to the nxt ch2 sp of prev sq and the sq below, ch1, finish the nxt set of 3dc, *slst in the nxt sp of the sq below, 3dc in the nxt sp of new sq* rep to nxt ch2 sp, 3dc, ch1,then join with a slst to the nxt chain spaces of the 2 squares below, ch1, finish the nxt set of 3dc then cont with pattern to end of the square, join with slst to the sdc, slst nxt st, ch1 & cut yarn.
Repeat Sq2 joining method for the next 3 squares. Exemption is on the last ch sp join for sq5, where you will join it to one chain space since it is at the end.
{For R3 to R9 for xs to 2xl & R3 to R8 for 3xl-5xl,
Repeat R2 pattern}.
Front Panels.{Make 2}
Row 1 (R1)
Square 1.
Start by working the last round of one square with your
main color.
Square 2.
Join MC with a sdc in any ch2 sp, 2dc,ch2,3dc same space, Continue
with the granny sts to nxt ch2 sp, 3dc in the ch2 sp, ch1, attach the square 2 to any ch2sp of square1 with a slst, ch1, finish the nxt set of 3dc in the sq2 ch2sp, *slst in the nxt sp of Sq1,3dc in the nxt sp of sq2* rep to nxt ch2 sp of sq2, 3dc, ch1,then join with a slst to the nxt ch2 sp of sq1, ch1, finish the nxt set of 3dc in the sq2 ch2sp, then cont with pattern to end of the sq2, join with slst to the sdc, slst nxt st, ch1 & cut yarn.
Row 2 (R2)
Join the first square on the bottom row of squares from left to right{if you’re right handed] and right to left for lefties.
Square 1.{sq1}
Join MC with a sdc in any ch2 sp, 2dc,ch2,3dc same space, Continue
with the granny sts to nxt ch2 sp, {3dc,ch2,3dc} In the ch2 sp,
Continue with the granny sts to nxt ch2 sp,3dc in the ch2 sp,
ch1, attach it to the corner ch2sp of sq5 row 1 with a slst, ch1, finish the nxt set of 3dc in the sq2 ch2sp, *slst in the nxt sp of bottom Sq,3dc in the nxt sp of sq1* rep to nxt ch2 sp of sq1, 3dc, ch1,then join with a slst to the nxt chain spaces of the 2 bottom squares, ch1, finish the nxt set of 3dc in the sq1 ch2sp, then cont with pattern to end of the sq1,join with slst to the sdc, slst nxt st, ch1 & cut yarn.
Square 2.{sq2}
With MC, work one side of the granny square,{from one ch2 sp to the next} 3dc in the ch2 sp, ch1, attach the square to the top ch2sp of prev sq with a slst, ch1, finish the nxt set of 3dc, *slst in the nxt sp of prev sq, 3dc in the nxt sp of new sq* rep to nxt ch2 sp, 3dc, ch1,then join with a slst to the nxt ch2 sp of prev sq and the sq below, ch1, finish the nxt set of 3dc, *slst in the nxt sp of the sq below, 3dc in the nxt sp of new sq* rep to nxt ch2 sp, 3dc, ch1,then join with a slst to the nxt chain spaces of the 2 squares below, ch1, finish the nxt set of 3dc then cont with pattern to end of the square, join with slst to the sdc, slst nxt st, ch1 & cut yarn.
{For R3 to R9 for xs to 2xl & R3 to R8 for 3xl-5xl,
Repeat R2 pattern}.
Sleeves. {Make 2}
Round 1
Square 1.{sq1}
Start by working the last round of one square with your
main color.
Square 2.{sq2}
Join MC with a sdc in any ch2 sp, 2dc,ch2,3dc same space, Continue
with the granny sts to nxt ch2 sp, 3dc in the ch2 sp, ch1, attach the square 2 to any ch2sp of square1 with a slst, ch1, finish the nxt set of 3dc in the sq2 ch2sp, *slst in the nxt sp of Sq1,3dc in the nxt sp of sq2* rep to nxt ch2 sp of sq2, 3dc, ch1,then join with a slst to the nxt ch2 sp of sq1, ch1, finish the nxt set of 3dc in the sq2 ch2sp, then cont with pattern to end of the sq2, join with slst to the sdc, slst nxt st, ch1 & cut yarn.
Square 3. {sq3}
Join MC with a sdc in any ch2 sp, 2dc same space, ch1, join it to the bottom ch2 sp corner of prev sq with a slst,ch1, finish the nxt set of 3dc in the sq3 ch2sp, *slst in the nxt sp of prev sq,3dc in the nxt sp,* rep to nxt ch2 sp, 3dc, ch1,then join with a slst to the nxt ch2 sp of prev sq, ch1, finish the nxt set of 3dc in the ch2sp, then cont with pattern to the next ch2 sp, 3dc, ch1,then join with a slst to the top ch2 sp of the first sq, ch1, finish the nxt set of 3dc in the ch2sp, *slst in the nxt sp of first sq,3dc in the nxt sp,* rep to nxt ch2 sp, 3dc, ch1,then join with a slst to the ch2 sp of sq1, ch1, finish the nxt set of 3dc in the ch2sp, then cont with pattern to end, join with slst to the sdc, slst nxt st, ch1 & cut yarn.
Round 2
Square 1.{sq1}
Start by making one side of the granny square{from one ch2 sp to the next} in the 2nd ch2 sp, 3dc, ch1 then join it with a slst in the ch spaces of the last & first sq of prev round, ch1, finish the next set of 3dc, *slst in the nxt sp of bottom sq,3dc in the nxt sp,* rep to nxt ch2 sp, 3dc, ch1,then join with a slst to the ch-sp of first & 2nd sq of prev round, ch1, finish the nxt set of 3dc in the ch2sp, then cont with pattern to end, join with slst to the sdc, slst nxt st, ch1 & cut yarn.
Square 2. {sq2}
Join MC with a sdc in any ch2 sp, 2dc same space, ch1, join it to the top ch2 sp corner of prev sq with a slst,ch1, finish the nxt set of 3dc in the ch2sp, *slst in the nxt sp of prev sq,3dc in the nxt sp,* rep to nxt ch2 sp, 3dc, ch1,then join with a slst to the nxt ch sp of prev sq and bottom sq{2nd sq r1}, ch1, finish the nxt set of 3dc in the ch2sp, *slst in the nxt sp of bottom sq, 3dc in the nxt sp,* rep to nxt ch2 sp, 3dc, ch1,then join with a slst to the ch-sp of bottom squares{sq2 & sq3 r1}, ch1, finish the nxt set of 3dc in the ch2sp, then cont with pattern to end, join with slst to the sdc, slst nxt st, ch1 & cut yarn.
Square 3. {sq3}
Join MC with a sdc in any ch2 sp, 2dc same space, ch1, join it to the top ch2 sp corner of prev sq with a slst,ch1, finish the nxt set of 3dc in the sq3 ch2sp, *slst in the nxt sp of prev sq,3dc in the nxt sp,* rep to nxt ch2 sp, 3dc, ch1,then join with a slst to the nxt ch-sp of prev sq and bottom 3rd sq, ch1, finish the nxt set of 3dc in the ch2sp, then cont joining your sq to the bottom 3rd sq until the next ch2 sp, 3dc, ch1,then join with a slst to the bottom 3rd sq sp and the ch-sp of the first sq, ch1, finish the nxt set of 3dc in the ch2sp, *slst in the nxt sp of first sq,3dc in the nxt sp,* rep to nxt ch2 sp, 3dc, ch1,then join with a slst to the ch2 sp of the first sq, ch1, finish the nxt set of 3dc in the ch2sp, then cont with pattern to end, join with slst to the sdc, slst nxt st, ch1 & cut yarn.
Repeat the same pattern for round 2 to add another round.
Note: if you want a longer sleeve that the one in the pattern, you can add another round of squares.
Joining the Seams.
Working on the right side,
Shoulders
Join the shoulder seams first using the mattress join Method.
Side seams (do this for both sides)
Mark the middle stitch of the 2nd square from the shoulder seam of both front and back for armhole. Then join the side seams from bottom to the stitch next to marker.
Attaching sleeves to armhole.
Attach the sleeve to the armhole using mattress join method, starting from the marked stitch all the way around. Note: the 2 squares right next to the shoulder seam should align with 2 squares of the sleeve.
Neckband.
Row 1.
Attach new yarn at the center space of the back neckline with a sdc, 2dc same space, *3dc next space* repeat this to end of back neck,
Turn to front panel, then continue placing 3dc in each space all the way to the ch2 space at the bottom corner, 3dc, ch2, 3dc in the ch2 sp.
Turn to the bottom then continue with 3dc in ea space to the next ch2 sp on the opposite corner, 3dc, ch2, 3dc in the ch2 sp.
Turn to the opposite front panel, 3dc in ea space to the shoulder seam, turn to the back and continue with 3dc in ea space to the last, join it to the first sdc with s slst, slst next st, ch1 & cut yarn.
Turn.
Row 2 to row 5
Attach new yarn to the last space of prev row with a sdc, 2dc same sp, 3dc in ea space to the bottom ch2 sp, {3dc, ch2 3dc, in the ch2sp} cont with 3dc in ea space to the next ch2 sp, {3dc, ch2 3dc, in the ch2sp}, 3dc in ea space to end of row, join to sdc with a slst, slst next st, ch1 & cut yarn. Turn
At the end of row 5, finish off your work and weave in all ends. You can add more rows if you want a longer cardigan.



Do you have the granny square cardigan for sale as a pdf? I would love to buy one. Thanks.
How many yards of yarn did you use? I have a client ordering one in cotton yarn and I’m trying to guesstimate my yardage for this project so I know how much to actually buy
I’ve updated the amount of yarn needed. for the xs to m size, you’ll beed approximately 1120g.