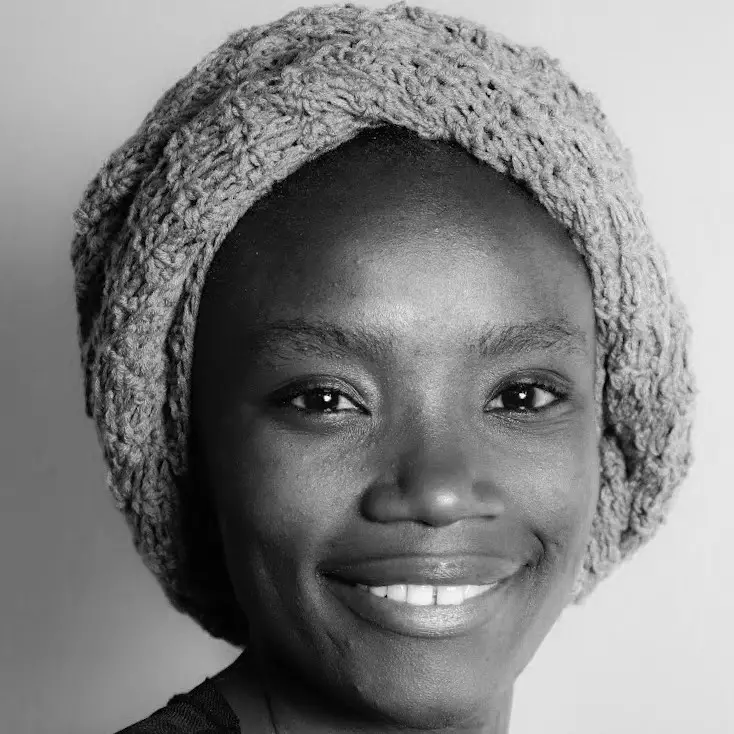
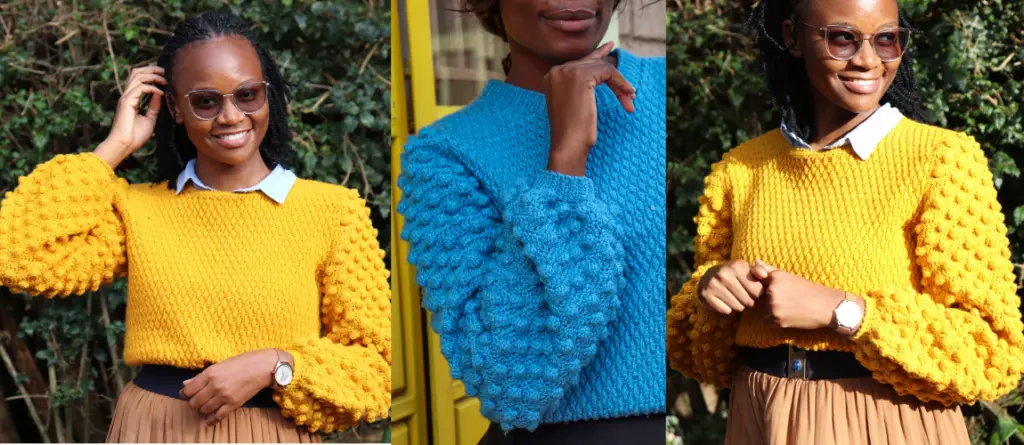
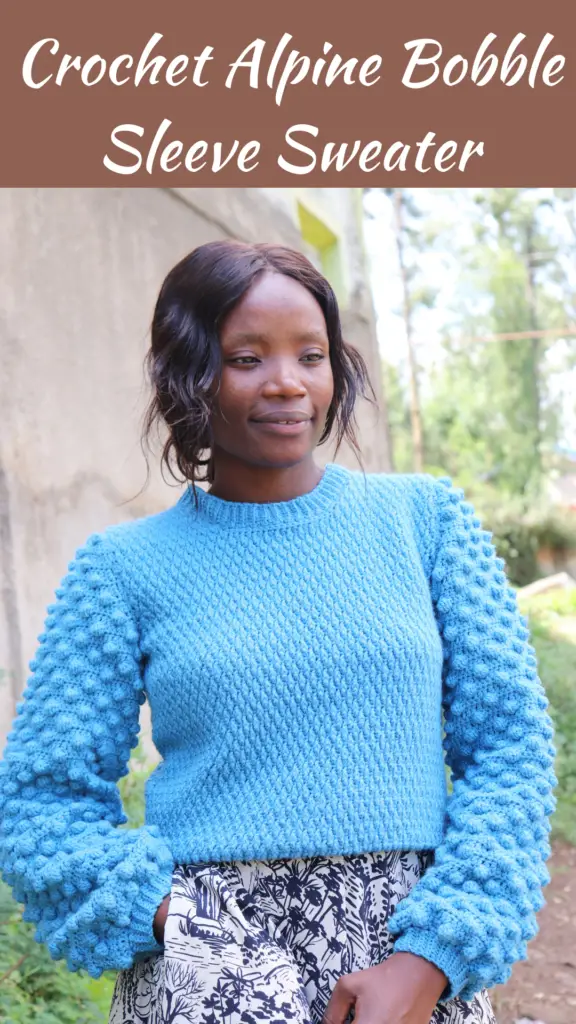
The alpine bobble sleeve crochet sweater is a timeless and classic pattern that uses two main crochet stitches. It uses the alpine stitch for the main body and the bobble stitch for the sleeves. This gives it a unique and classic look for a crochet sweater. This crochet sweater also has a fitted sleeve construction that takes away the bulge under the arm.
Construction.
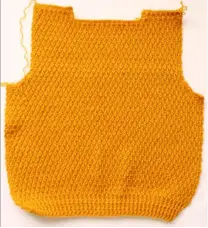
This crochet sweater is constructed in 4 panels which are then sewn together. The front and the back panel are made separate from the bottom hemline towards the shoulders then shaped around armhole and the neckline. They are then sewn along the shoulder seam using whip stitch or slip stitches.
The sleeves are also made in rows from the cuff towards the underarm, then the armhole is shaped to fit seamlessly around the upper arm. Once both sleeves are complete, they’re attached to the armhole and then the side seam is sewn from cuff to underarm, then from underarm to hemline.
The cuff ribbing and neck ribbing are added once all the panels have been assembled or joined.

Materials Needed.
- Yarn.
The yarn used is ice yarns classic dk. This is a light / dk weight yarn.
To substitute this yarn, you can use any light weight yarn that matches the gauge provided. Here are some of the options you can choose from. Premier Anti-Pilling Everyday DK Yarn, Mary maxim sunrise yarn, 24/7 Cotton DK Yarn, coboo yarn.
Approximately yarn needed.
| Sizes | Xs | S | M | L | Xl | 2xl |
| Yarn Needed grams) | 485g | 512g | 566g | 614g | 665g | 724g |
- Crochet hooks. The pattern calls for a 3.5 mm and 4.5 mm hooks.
Abbreviations / Stitches Used.
st = stitch ch = chain dc = double crochet
sc = single crochet rep = repeat pat = pattern
dec = decrease sl st = slip stitch Bo-st = bobble stitch
fpdc = front post double crochet yo = yarn over
Sc2tog = single crochet 2 together. Sc blo = single crochet in the back loop only
Dc2tog = double crochet 2 together
[sc2tog x 2] = single crochet 2 together twice.
Special Stitches.
Single crochet 2 together (sc2tog): insert hook in the next stitch, yarn over and pull through the stitch (2 loops on hook), insert hook in the next stitch, yarn over and pull through the stitch (3 loops on hook), yarn over and pull through the three loops.
Double crochet 2 together (dc2tog): yarn over, insert hook in the next stitch, yarn over and pull through the stitch (3 loops on hook), yarn over and pull through 2 loops, yarn over, insert hook in the next stitch, yarn over and pull through the stitch (4 loops on hook), yarn over and pull through the first 2 loops, yarn over and pull through the three loops.
Bobble {bo-st}: yo, insert hook in the next stitch, yo and pull through the stitch, [yo, insert hook in the same stitch & pull through] repeat instructions in [-] until you have 6 loops on hook, yo & pull through all the 6 loops. Then follow with the stated number of sc stitches in the next stitches.
Sizing & Measurements
This pattern is available in 6 sizes, (xs, s, m, l, xl & 2xl) and the measurements are given in Inches (“).
Sizes: xs (s, m, l, xl, 2xl)
To fit bust: 28” (32”, 36”,40”, 44”, 48”)
Finished bust: 30” (34”, 38”, 42”, 46”, 50”)
Back width: 15” (17”, 19”, 21”, 23”, 25”)
Sweater length: 20” (20”, 20.5”, 20.5”, 21”, 21.5”)
Gauge.
With 4.0 mm crochet hook, working in alpine stitch,18 sts and 16 rows measure 4 inches (”)
You can get the ad-free printable version on my Etsy shop or ravelry. I highly recommend downloading the pattern from ravelry. By doing so, you can share your project status with other creators.
Pattern Notes:
- The pattern is written in US TERMINOLOGY.
- Part of the pattern is written in shorthand, for example, sc 5 means you place sc in the next 5 stitches, fpdc, bpdc means you place fpdc in a stitch then bpdc in the next stitch
- Repeat instructions after the asterisk sign: *, as stated in the following statement.
- Ch 2 at the beginning of a new row counts as a stitch, unless stated otherwise in the pattern.
- The photos used are for medium size.
- The model is 5 ft 6 inches, with a bust size of 36 and wears medium size.
- The pattern gives a negative 2” to 0” ease with a normal fit.
- Number stated at the end of a row is the stitch count for each size.
- Sweater is constructed in 4 pieces.(1 front, 1 back and 2 sleeve panels).
- [sc2tog x 2] means you work single crochet 2 together in the next 2 stitches, then you repeat it again. This will reduce our stitch count by 2. whereas [sc2tog] means you work single crochet 2 together in the next 2 stitches only, reducing stitch count by 1.
Video Tutorial.
If you are a more visual learner, you can follow along with the video tutorial.
Alpine Bobble sleeve crochet sweater pattern.
Back panel.
###
Bottom ribbing.
With a 3.0 mm hook,
Chain 65 (75, 83, 93, 101, 111)
Row 1:
Dc in 4th chain, and in each chain to end of row. 63 (73, 81, 91, 99, 109) sts. turn
Row 2.
Ch 2{counts as first dc}, *fpdc in next st, bpdc in next st* rep until 2 sts remain, fpdc in next st, dc in last st. Turn.
Row 3.
Ch 2{counts as first dc}, *bpdc in next st, fpdc in next st* rep until 2 sts remain, bpdc in next st, dc in last st. Turn.
Repeat row 2 & row 3 until you have 8 rows.
Note: you can add more rows for a longer ribbing. Just ensure to end it on row 2 repeat.
Main Body.
Change to a 4.0 mm hook.
Row 1.
Ch 1, sc in first st and each st to end of row. 63 (73, 81, 91, 99, 109) sts. turn
Row 2.
Ch 2 (counts as first dc), * fpdc around the next post st, 2 rows below, {skip the sc st behind the fpdc} dc in next st. repeat pat from * to end of row. Turn
Row 3.
Ch 1, sc in first st and each st to end of row. 63 (73, 81, 91, 99, 109) sts. turn
Row 4.
Ch 2, dc next st * fpdc around the next dc st, 2 rows below, {skip the sc st behind the fpdc} dc in next st. rep pat from * until 2 sts remain, dc in the last 2 sts. Turn
Row 5
Ch 1, sc in first st and each st to end of row. 63 (73, 81, 91, 99, 109) sts. turn
Row 6.
Ch 2, * fpdc around the next dc st, 2 rows below, {skip the sc st behind the fpdc} dc in next st. repeat from * to end of row. Turn
Row 7.
Rep row 5
Row 8.
Ch 2, dc next st * fpdc around the next dc st, 2 rows below, {skip the sc st behind the fpdc} dc in next st. rep pat from * until 2 sts remain, dc in the last 2 sts. Turn
Row 9.
Rep Row 5.
Repeat row 6 to row 9 until you have 49 rows or until your work measures 13”.
This is the length from bustline to bottom ribbing. You can customize it to your desired length.
Your work should end after row 8 & 9 pattern, then turn.
Shaping armholes and neck.
Row 1.
Sl st in the first 3(5, 5, 7, 7, 7) sts, then;
Ch 2 (counts as first dc), * fpdc around the next dc st, 2 rows below, {skip the sc st behind the fpdc} dc in next st. repeat pat from * until {2(4,4,6,6,6) sts} rem, then turn. 59 (65, 73, 79, 87, 97) sts
Row 2.
Ch 1, sc in first st, [ sc2tog x 2 ], sc in each st until 5 sts rem, [ sc2tog x 2 ], sc in last st. 55(61, 69, 75, 83, 93) sts, Turn
Row 3.
Ch 2, dc next st *fpdc around the next dc st, 2 rows below, {skip the sc st behind the fpdc} dc in next st. Rep pat from * until 2 sts remain, dc in the last 2 sts. 55(61, 69, 75, 83, 93) sts,Turn
Row 4
Ch 1, sc in first st, [sc2tog], sc in each st until 3 sts rem, [sc2tog], sc in last st. 53 (59, 67, 73, 81, 91) sts, Turn
Row 5.
Ch 2, dc next st *fpdc around the next dc st, 2 rows below, {skip the sc st behind the fpdc} dc in next st. rep pat from * until 2 sts remain, dc in the last 2 sts. Turn
Repeat rows 4 & 5 until you have 7(9, 9, 11, 11, 11) rows.
At this point you should have: 51(55, 63, 67, 75, 85) sts
Row 8 (10, 10, 12, 12, 12)
Ch 1, sc in each stitch across. 51(55, 63,67,75, 85) sts Turn.
Row 9 (11, 11, 13, 13, 13)
Ch 2, *fpdc around the next dc st, 2 rows below, {skip the sc st behind the fpdc} dc in next st. Rep from * to end of row. Turn
Row 10 (12, 12, 14, 14, 14)
Ch 1, sc in first st and each st to end of row. turn
Row 11(13, 13, 15, 15, 15).
Ch 2, dc next st *fpdc around the next dc st, 2 rows below, {skip the sc st behind the fpdc} dc in next st. Rep from * until 2 sts remain, dc in the last 2 sts. Turn
Row 12(14, 14, 16, 16, 18)
Ch 1, sc in first st and each st to end of row. 51(55, 63, 67, 75, 83) sts. turn
###
Repeat the last 4 rows until you have 24(26 , 26, 28, 28, 30) rows.
Do not cut yarn. Proceed to row 1 of neckline & shoulder
Shaping Neckline and shoulder.
Mark the 15th (17th, 19th, 21st, 25th, 27th ) stitch from both sides.
Row 1 {right shoulder}
Ch 2, *fpdc around the next dc st, 2 rows below, dc in next st. Repeat from *, ending on st with marker. Turn
Row 2
Ch 1, sc in first st, [sc2tog], sc in each st to end of row. 14 (16, 18, 20, 24, 26) sts, Turn
Row 3.
Ch 2, dc next st *fpdc around the next dc st, 2 rows below, dc in next st* rep pat from * to end of row. Turn
Row 4
Ch 1, sc in first st and each st to end of row. 14 (16, 18, 20, 24, 26) sts.
Ch 1, cut yarn and turn to left shoulder.
Row 1 {left shoulder}
Attach yarn on the st with marker, then chain 2,
*fpdc around the next dc st, 2 rows below, dc in next st. Rep from * to the end of row. Turn
Row 2
Ch 1, sc in first st, sc in each st until 3 sts rem, [sc2tog], sc in last st. 14 (16, 18, 20, 24, 26) sts, Turn
Row 3.
Ch 2, * fpdc around the next dc st, 2 rows below, dc in next st. Rep from * until last st rem, dc in the last st. Turn
Row 4
Ch 1, sc in first st and each st to end of row. 14 (16, 18, 20, 24, 26) sts.
Ch 1, cut yarn.
Front panel.
Repeat pattern from row 1 of bottom ribbing to Row 12(14, 14, 16, 16, 18) of shaping armhole as of back panel.
Or from ### to ### as of back panel.
Then continue and repeat your last 4 rows until you have 16 (18, 18, 20, 20, 22) rows.
Shaping Neckline and shoulder.
Mark the 19th (21st, 23rd, 25th,29th ,31st,) stitch from both sides.
Row 1 {right shoulder}
Ch 2, * fpdc around the next dc st, 2 rows below, dc in next st. Rep from *, ending on st with marker. Turn
Row 2
Ch 1, sc in first st, [sc2tog], sc in each st to end of row. 18 (20, 22, 24, 28, 30) sts, Turn
Row 3.
Ch 2, dc next st * fpdc around the next dc st, 2 rows below, dc in next st. Rep from * to end of row. Turn
Row 4.
Rep row 2
Row 5.
Ch 2, * fpdc around the next dc st, 2 rows below, dc in next st, Repfrom *, until 2 sts rem, fpdc 2 rows below, dc in last st. Turn
Row 6
Rep row 2.
Rep rows 3 to 6 until you have 10 rows.
Row 11,
Rep row 3
Row 12.
Ch 1, sc in each st. 14 (16, 18, 20, 24, 26) sts.
Ch 1, cut yarn.
Row 1 {left shoulder}
Attach yarn on the st with marker, then chain 2,
* fpdc around the next dc st, 2 rows below, dc in next st, Rep from *, to the end of row. Turn
Row 2
Ch 1, sc in first st, sc in each st until 3 sts rem, [sc2tog], sc in last st. 18 (20, 22, 24, 28, 30) sts, Turn
Row 3.
Ch 2, * fpdc around the next dc st, 2 rows below, dc in next st, Rep from * until last st rem, dc in the last st. Turn
Row 4
Rep row 2.
Row 5.
Ch 2, * fpdc around the next dc st, 2 rows below, dc in next st, Rep from * to end of row.
Row 6.
Rep row 2.
Rep rows 3 to row 6 until you have 10 rows.
Row 11.
Rep row 3
Row 12.
Ch 1, sc in each st. 14 (16, 18, 20, 24, 26) sts.
Ch 1, cut yarn.
Sleeves.
Make 2.
Foundation chains are Multiples: {6 + 3} sts
With 4 mm hook, Chain 63 (69, 69, 75, 75, 81)
Row 1,
Working in the back bumps of the foundation chains,
Skip 1 ch, sc in the 2nd ch and every chain to end of row. Turn. 62(68, 68, 74, 74, 80) sts
Row 2.
Ch 1, sc in the first st and next 4 sts, bobble (refer to special stitches) in next st, * sc 5, bo-st , rep pattern from * until 2 sts rem, sc in the last 2 sts.
Row 3.
Ch 2, dc in next st and every st to end of row.
Row 4.
Ch 1, sc in the first 2 sts, * bo-st, sc 5, rep from * to end of row.
Row 5.
Ch 2, dc in next st and every st to end of row.
Repeat row 2 to row 5 until you have 57 rows.
Shaping sleeve armhole.
Row 58
Ch 1, sl st in the first 3 sts, sc in next 2 sts, *bo-st, sc 5, rep from * until 3 sts rem, leave them & turn to next row.
Row 59
Ch 2, [dc2tog] twice, dc in each st until 5 sts rem, [dc2tog] twice, dc in last st. 52 (58, 58, 64, 64, 70) sts. Turn.
Row 60.
Ch 1, sc in 1st st, [sc2tog], * bo-st, sc 5, rep from * until 7 sts rem, bo-st, sc 3, [sc2tog], sc in last st. Turn
Row 61.
Rep row 59.
Row 62.
Rep Row 60.
Rep last 2 rows until you have 66 (66, 66, 68,68,70) rows.
You should have: 32 (38, 38, 38, 38, 38) sts.
Row 67 (67, 67, 69, 69, 71)
Ch 2, [dc2tog], dc in each st until 3 sts rem, [dc2tog] dc in last st. 30 (36, 36, 36, 36, 36)sts. Turn
Row 68 (68, 68, 70, 70, 72)
Ch 1, sc in 1st st, [sc2tog], sc in next st, *bo-st, sc 5, rep from * until 8 sts rem, bo-st, sc 4, [sc2tog], sc in last st. Turn.
Row 69 (69, 69, 71, 71, 73)
Ch 2, [dc2tog], dc in each st until 3 sts rem, [dc2tog] dc in last st. Turn
Row 70 (70, 70, 72, 72, 74)
Ch 1(doesn’t count as a st) *sc 5, bo-st* rep until 2 sts rem, sc 2. Turn.
Row 71 (71, 71, 73, 73, 75)
Ch 2, [dc2tog], dc in each st until 3 sts rem, [dc2tog] dc in last st. Turn
Row 72(72, 72, 74, 74, 76)
Ch 1, sc in 1st st, [sc2tog] sc 4, bo-st, *sc 5, bo-st* rep until 4 sts rem, sc, [sc2tog], sc in last st. Turn.
Row 73 (73, 73, 75, 75, 77)
Ch 2, [dc2tog], dc in each st until 3 sts rem, [dc2tog] dc in last st. Turn
Row 74 (74, 74, 76, 76, 78)
Ch 1, sc first 2 sts, *bo-st, sc 5* rep to end of row. Turn
Row 75 (75, 75,77,77,79)
Ch 1, sc in each st. 20 (26, 26, 26, 26, 26). ch 1 & cut yarn.

Assembly.
Shoulder Seams.
- With Right side facing, join the shoulder seams using mattress stitch.
Attaching Sleeves to body.
- Turn to wrong side of work {both body and sleeve}.
- Mark the center stitch of top row of sleeve and pin it to the shoulder seam.
- Lay the sleeved relaxed and {pin the sleeve armhole rows to the body armhole rows}.
- Then sew it along still on the wrong side.
- Do this for both sleeves.
Side Seams.
- Still on the wrong side,
- Sew the side seams from sleeve cuff to under arm, then from underarm to the bottom of body.
- Do this for the other side.
Neck Ribbing.
First round.
- With 3.0 mm hook, attach yarn in any stitch on the back panel, sc in the same st and each stitch until the row stitches,
- then place 2 sc around the dc stitches & 1 sc around the sc sts until shoulder seam.{remember to repeat this on the opposte side rows}
- On front panel rows, place 2 sc around each dc stitch and 1 sc around each sc stitches. Continue with sc in each st for the front panel sts , then 2 sc around the opposite side rows dc sts, & 1 sc around the sc sts,
- When you reach the back panel sts, sc in each stitch then sl st to join.
Ribbing
Ch 11,
Row 1:
Working on the back bumps, skip 1 chain, then sc in every other chain to end of row.
Sl st in the same stitch as chains, sl st in the next st of first round. Turn.
Row 2:
Skip the sl st(s), sc blo in each of the sc stitches. Turn
Row 3:
Ch 1, sc blo in each st to end of row, sl st in next 2 sts of first round. Turn
- Repeat rows 2 and 3 all the way around, ending on row 2 pattern.
- Join the ribbing seams using mattress stitch or just sew then together.
Adding Cuff Ribbing.
Attach yarn in the stitch next to the seam, at the cuff.
Round 1.
Sc2tog all around. 31(34, 34, 37, 37, 40) sts
Ribbing.
Chain 7 for xs to m & Chain 11 for l to 2xl
Row 1:
Skip 1 chain, then sc in every other chain to end of row.
Sl st in the same stitch as chains, sl st in the next st of round 1. Turn.
Row 2:
Skip the sl st(s), sc blo in each of the sc stitches. Turn
Row 3:
Ch 1, sc blo in each st to end of row, sl st in next 2 sts of round 1. Turn
Rep row 2 and row 3 all around, then ch1, cut yarn and seam to close cuff.
When you’re done, weave in all the loose ends and enjoy your Sweater.


Leave a Reply