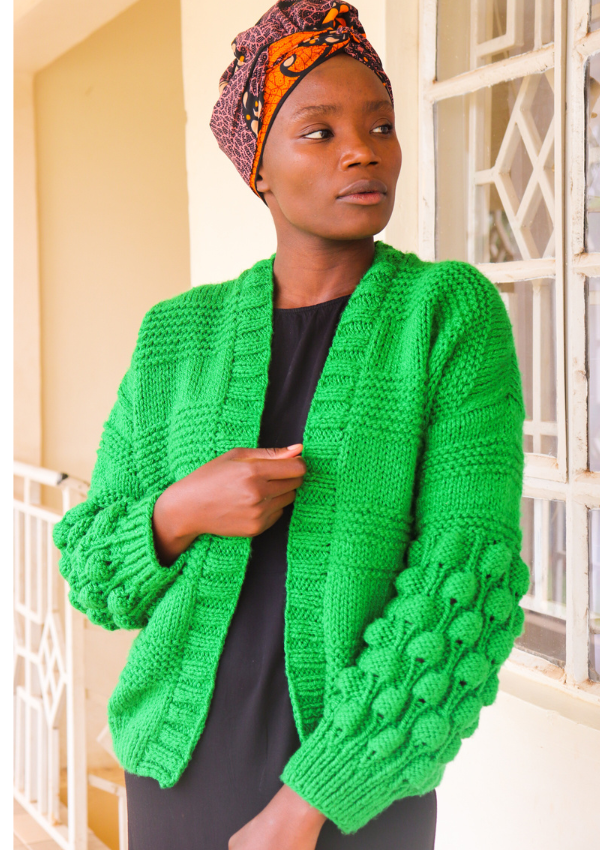
Can we all just admit how the bobble sleeves add texture to this knit cardigan. I recently learnt how to knit and I just can’t put down the knitting needles. There’s something therapeutic about knitting such delicate but fun stitches.
At first, I was intimidated by the knit strawberry puff stitch but learning it just made me fall in love instantly. It has a repeat pattern that kicks in your muscle memory once you’ve made a few rows.

This Pattern requires intermediate knitting knowledge but if you’re patient enough to go through it and learn the stitches used, you can make it even as a beginner. Trust me,
Special stitch explanation
Puff.
K1,yo,k1,yo,k1 in the same stitch
K5tog through the back.
Pass 5 sts on a crochet hook through the back of the sts, then yarn over and pull through all the sts on the crochet hook, then insert the right hand needle in the loop and release the crochet hook.
1×1 ribbing
Row 1. *K1,P1* repeat from * to end of row.
Row 2. *P1,K1* repeat from * to end of row.
Repeat row 1 &2
Yarn Used.
I used Atlas Green Bulky by Ice yarns. This was my first time using a bulky yarn and I enjoyed every bit of It. Contrary to crochet, knit fabric drapes well and tend to be lighter. The Yarn is also light despite being bulky weight and you should try it.
For this project, you will need approximately 695(790,880,945,1005) meters of this yarn to complete. If you can not access the yarn, you can substitute it with any similar weight of yarn. Note your gauge should be the same as stated in the pattern.
Notes.
- This cardigan is worked in 5 parts, then sewn together.{2 sleeves, 2 front panels and 1 back panel}
- The sizing guide follows for sizes xs(s, m, l, xl, 2xl)
- The panels are worked back and forth in rows, from bottom up.
- After joining all the panels together, stitches are picked along the front opening stitches for the front/neckband ribbing.
- The pattern is for a slightly oversized design. If you want a more fitted cardigan, work a size smaller.
Gauge.
Working in the stockinette stitch with 8mm needles, 13sts and” 16 rows measure 4” square.
Materials
- A pair of 7mm & 8mm circular knitting needles
- Bulky weight yarn. I used Atlas by Ice yarns. You can substitute it with any bulky yarn that will give you the gauge.
- Scissors
- Yarn needle
- Tape measure (optional)
- 4 stitch markers
Abbreviations
K = knit RS = right side
P = purl WS = wrong side
K5tog = knit 5 together
Puff = knit 5 in the same stitch.
SKILL LEVEL:

YARN WEIGHT:

Sizing and finished measurements.
| Size | Fitted Bust | Finished Bust | Back width | Full length | Size | Fitted Bust | Finished Bust | Back width | Full length |
| XS | 28”- 30” | 40” | 20” | 24” | L | 40”- 42” | 50” | 25” | 24” |
| S | 32”- 34” | 43” | 21.5” | 24” | XL | 44”- 46” | 54” | 27” | 24” |
| M | 36”-38” | 46” | 23” | 24” | 2XL | 48”- 50” | 58” | 29” | 24” |
Bobble Sleeve Knit Cardigan Pattern
Sleeves
Make 2 identical pieces.
The sizing guide for sleeves only is xs&s (m&l, xl&2xl)
Cuff:
Using a 7mm Cast on 43(49,55)
Row 1. k1 *p1, k1* repeat to the end of row.
Row 2. p1 *k1,p1* repeat to the end of row.
Repeat last 2 rows until you have 10 rows of cuff ribbing.
Main sleeve
Change to 8mm needles
Row 1: k1 *p2, k1* rep to the end of row.
Row 2: P1 *k2, p1* rep to the end of row.
Row 3: K1, *p2, puff in the nxt st, p2, k1* rep to the end of row.
Row 4: P1 *k9, p1* rep to the end of row.
Row 5: K1 *p9, k1* rep to the end of row.
Row 6: Rep row 4.
Row 7: Rep row 5.
Row 8: Rep row 4.
Row 9: K1, p2, k5tog, *p2, puff in the nxt st, p2, k5tog* rep to last 3 sts, p2, k1.
Row 10: P1, k2, p1 *k9, p1* rep to last 3 sts, k2, p1.
Row 11: K1, p2, k1 *p9, k1* rep to last 3 sts, p2, k1.
Row 12: Rep row 10.
Row 13: Rep row 11.
Row 14: Rep row 10.
Row 15: K1, p2, *puff in the nxt st, p2, k5tog, p2* rep to the last 4 sts, puff in the nxt st, p2, k1.
Repeat row 4 to 15, TWO more times, or until row 39.
Row 40-44: repeat row 4 to 8.
Row 45: K1, p2, k5tog, *p2, k1,p2, k5tog* rep to last 3 sts, p2, k1.
Row 46: P1, knit ea st until the last, p1.
Row 47: Knit all.
Row 48: rep 46
Row 49: rep 47
Row 50: rep 46
Row 51: rep 47
Row 52: Purl all
Row 53: knit all
Row 54 to 57: alternate row 52 and 53.
Row 58 to 65: alternate row 46 and 47.
Row 66 to 70: alternate row 52 and 53.
Bind off.
Pin this here for later.

Make two identical pieces .
Front Panels.
Hem ribbing.
With 7mm needles
Cast on 26(28,30,34,36,38)
Work in 1×1 ribbing for 10 rows.
Main body.
Change to 8mm needles.
Row 1: Knit all
Row 2: Purl all
Rep row 1&2 until row 11.
Row 12: P1, knit ea st to the last, p1.
Row 13. Knit all.
Rep row 12&13 until row 24.
Repeat rows 1 to 24 until you have 96 rows.
Row 97 to 108: Repeat rows 1 to 12.
Bind off.
Back Panel.
Hem ribbing.
With 7mm needles, Cast on 64(70,76,82,88,94).
Work 10 rows of 1×1 ribbing.
Main body.
Change to 8mm needles.
Row 1: Knit all
Row 2: Purl all
Rep row 1&2 until row 11.
Row 12: P1, knit ea st to the last, p1.
Row 13. Knit all.
Rep row 12&13 until row 24.
Repeat rows 1 to 24 until you have 96 rows.
Row 97 to 108: Repeat rows 1 to 11.
Bind off.
Joining the sides & shoulder panels.
- Using mattress stitch, join the shoulder seams together.
- Place marker on the 26th(for xs&s) 30th (for m&l) and 34th (for xl&2xl) sts from the shoulder (of both front and back panels) to mark armhole. Then join the sides all the way to the hem, using mattress stitch.
Attaching sleeves to armhole.
- Attach the sleeves to the armhole using mattress stitch by joining 3sts of the sleeve to 3 sts at the armhole, then skip 1 st at the armhole* continue the pattern until all stitches are joined together.
- When done attaching the sleeve to the armhole, Join sleeves together using the mattress stitch.
Neck Band.
With 8mm circular needles.
On the right side, Starting from hem ribbing, pick each st at the hem, continue picking *4sts, sk 1* for the main body until you reach back neck sts, pick each st at the neck, continue picking *4sts, sk 1* for the main body until the opposite hem, pick ea st for the hem (you should have a multiple of 4+2 sts).
Row 1.
P2,* k2, p2* rep to the end of row.
Row 2.
K2 *p2, k2* rep to the end of row.
Row 3.
P2,* k2, p2* rep to the end of row.
Repeat row 2 &3 until ribbing measures 2” or as desired.
Cast off all stitches on the RS, then weave in the ends.
Your cardigan is finished and we hope you enjoyed making it. Please leave us a review and feel free to tag us your finished cardigan on any social media platform.


Leave a Reply